Yesterday I started to play with the rather new Corona render engine which has just been released for Max and is currently in development for Cinema 4d, Blender and Maya. There is a free alpha version available for Cinema 4d. This version will remain free until summer at witch point hopefully the release version will be ready. I downloaded this version Yesterday and I’m very pleased with what it does at this point. It is very fast, especially for a cpu renderer, easy to set up and delivers gorgeous results. I can highly recommend to download it and give it a try!
However, there is one nasty bug – surprisingly the only one I came across so far – that crashes the plugin after the second frame or so when rendering animation. According to their forum this doesn’t always seem to be the case, but I couldn’t get Corona to render more then two frames. Now, since I mostly do animation and Corona’s speed and quality really turned me on, I was looking for a workaround and found one in the combination of a script and a little plug-in. So for those of you interested, I’ll describe briefly how to get it running. This will probably be redundant soon when the next update arrives, but until then it might be helpful.
The main idea is that one frame always renders safely. So you could spend all day rendering an animation one frame after the other. Not much fun. But this is exactly what the plug-in script combo will be doing for you. It will restart the (one frame) rendering with new settings until a given end frame is reached.
- Download the script and the plug-in: CoronaAniRender.py (script) – ScriptCaller.pyp (plug-in). Unzip.
- Install the script, either by putting it into the Cinema 4d script folder (C:\Program Files\MAXON\CINEMA 4D R15\library\scripts) or by importing it from within Cinema from the Script Manager (Script Manager: File -> Import…).
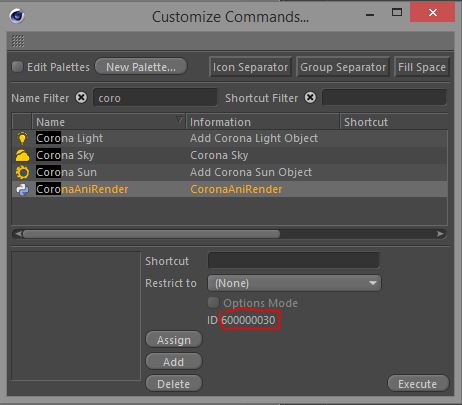
- Open the Customize Commands Window (Window -> Customization -> Customize Commands). Start typing “corona” in the Name Filter field until you see the CoronaAniRender script listed. Click on the script and copy down the ID displayed in the bottom right corner.

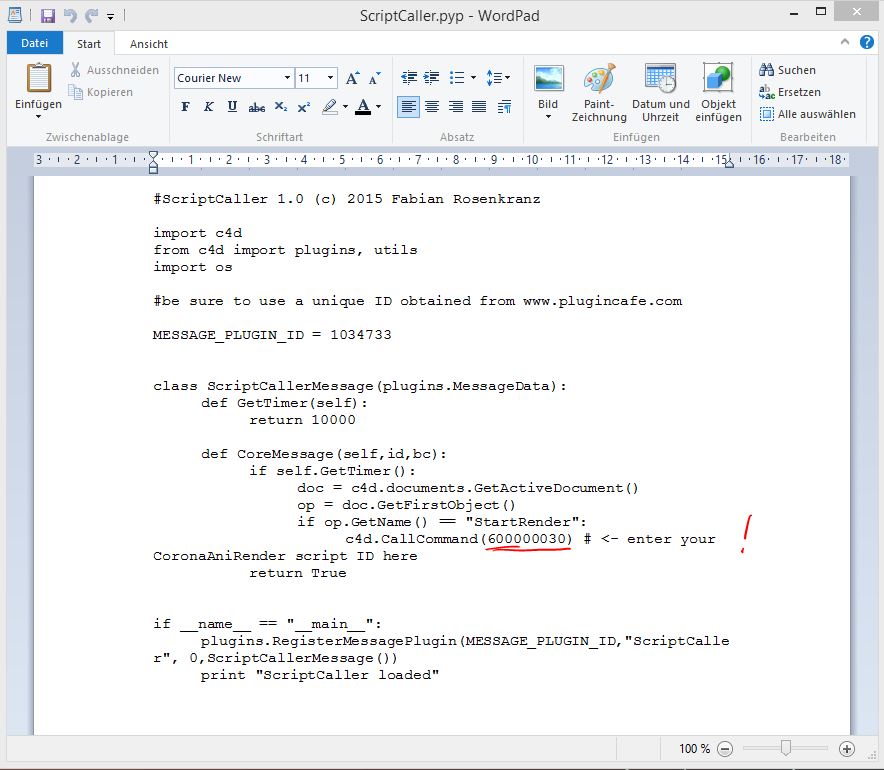
- Open the ScriptCaller.pyp plug-in file in a text editor (not Word!). Word Pad will be fine. Find the line that starts “c4d.CallCommand(600000030)” and replace the number with the one you copied in the last step. This is necessary because the plugin starts the script by calling its ID. Unfortunately script IDs are not static, unlike plug-in IDs, so you need to adjust that for every Cinema installation. Save the plug-in file and put it into Cinema’s plugin folder (C:\Program Files\MAXON\CINEMA 4D R15\plugins).

- Now the installation is done. Restart Cinema and open the file you want to render.
- Open the Render Settings and enter a name in the Save field. Choose an image format for output, not .mov or .avi. You will be rendering an image sequence.
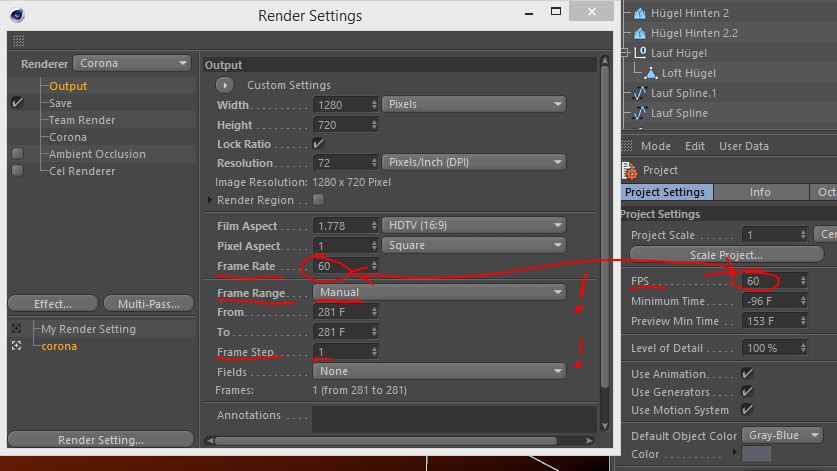
- on the Output page there are three important settings: (1) Frame Rate must be the same as FPS in your project settings. (2) Frame Range must be set to Manual (not Current Frame!). (3) Frame Step must be one. I haven’t tried field rendering, but I guess it is safest to leave Fields set to None.

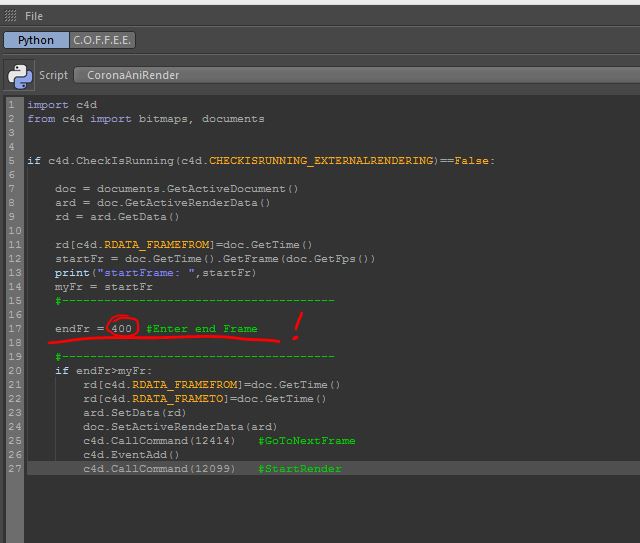
- You can ignore the From and To fields, those will be set by the script. Rendering will always start with the current frame in your document. The end frame must be set in the script. Open the Script Manager again, select the CoronaAniRender script and edit the number behind “endFr = ” in the script. Save the script.

- In order to start rendering, you need the upper most object in your scene to have the name “StartRender”. You can add a null object with that name for example. As long as it has that name and is on top, Corona will render frame after frame. Move or rename or delete the object to stop rendering.
This sounds harder then it is. There is one limitation, though, other then those mentioned above: You can’t work while rendering. The script is constantly sending your active document to the renderer. If you change the frame, the new frame will be rendered!


